You’ve unboxed your new iPhone, and now you’re wondering whether to move the SIM card from your old phone before you turn the new one on. Leave the SIM in your old phone until you’ve checked: if the new iPhone turns out to be eSIM-only, the old phone needs its active line to hand your number over. The answer depends on which iPhone you have. Many new iPhones don’t use a physical SIM card at all, and those that do can usually take it before or during setup.
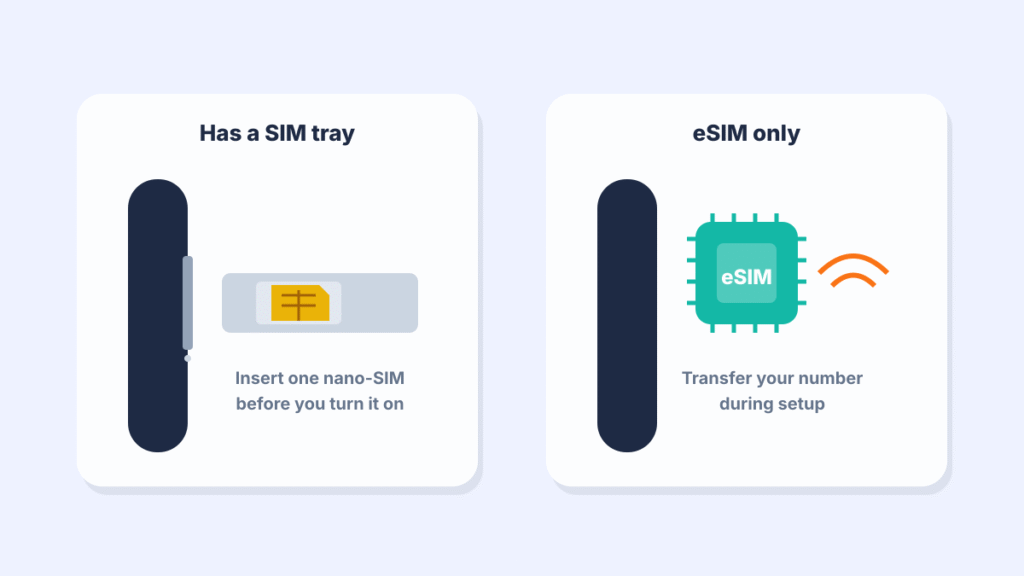
Quick answer: If your new iPhone has a SIM tray and you’re moving a physical SIM card, insert it before you turn the phone on, so it can activate during setup. If it has no SIM tray, there’s nothing to insert. That includes US models from the iPhone 14 onward, the iPhone Air and iPhone Duo in every country, and iPhone 17 and 18 Pro models in a growing list of countries. Your number moves as an eSIM during setup, either from your old iPhone with eSIM Quick Transfer or through your carrier.
Does your new iPhone have a SIM tray?
Look along the side of the phone for a small slot with a pinhole. No slot means your iPhone is eSIM-only.
| Your new iPhone | SIM type | What to do |
|---|---|---|
| No SIM tray: US iPhone 14 or later, iPhone Air or iPhone Duo anywhere, or iPhone 17 and 18 Pro models sold in Canada, Mexico, Japan and several other countries | eSIM only, no tray | Transfer your number during setup |
| Model with a SIM tray, moving a physical SIM | Physical SIM, plus eSIM on most | Insert the SIM card before turning it on (or transfer an eSIM during setup) |
| Phone from your carrier, number already assigned (this overrides the rows above) | eSIM set up by the carrier | Turn it on and follow the prompts |
If your new iPhone uses a physical SIM card
- Turn off your old iPhone, or leave it on if you still need to transfer data with Quick Start.
- Gently press a SIM eject tool or a small straightened paper clip into the hole beside the SIM tray on the old phone, then pull out the tray.
- Move the SIM card to the new iPhone’s tray, matching the notched corner, and push the tray back in.
- Turn on the new iPhone and follow the setup steps. The phone activates your service when it connects to Wi-Fi or cellular data.
You can transfer your data with Quick Start whether or not the SIM is in the new phone, so moving the SIM first doesn’t affect your apps or photos. If the new phone needs a different size SIM, contact your carrier for a replacement. Our guide to setting up a new iPhone from your old iPhone has the full steps.
If your new iPhone is eSIM-only
There’s no card to move. Instead, you transfer the phone plan digitally.
- Update both iPhones to iOS 18.4 or later, and make sure your old iPhone is unlocked with its passcode, nearby and has Bluetooth turned on.
- Turn on the new iPhone, connect to Wi-Fi and sign in with the same Apple Account you use on your old iPhone.
- When you reach the cellular setup screen, choose to transfer your number from your old iPhone.
- Confirm on the old iPhone when asked. Some carriers send a text or ask you to verify in their app.
- Wait for activation. Your old SIM stops working once the new iPhone’s plan is active.
If the transfer option doesn’t appear, check that both iPhones run iOS 18.4 or later. If they do, your carrier may not support eSIM Quick Transfer. If you already have a QR code from your carrier, tap Use QR Code right on the cellular setup screen. Otherwise, finish setup and activate the eSIM through your carrier’s app, Settings > Cellular > Add eSIM, or a call to customer service. If you bought the phone from your carrier with your number already assigned, the eSIM usually activates on its own during setup.
Transfer your number after setup
Skipped the cellular step? You can still do it.
- Open Settings on the new iPhone and tap Cellular.
- Tap Add eSIM or Set Up Cellular.
- Choose Transfer From Nearby iPhone (or Transfer From Android if you’re switching from Android), or pick the number listed, and follow the prompts.
Want to switch the SIM card in your new iPhone to an eSIM? If your carrier supports it, go to Settings > Cellular, tap your number and choose Convert to eSIM.
Moving from a physical SIM to an eSIM-only iPhone
If your old iPhone used a SIM card and your new one is eSIM-only, you can usually still transfer during setup with the same steps above. Some carriers handle this switch in their app instead. Coming from an Android phone? With iOS 26 or later on an iPhone 11 or newer, and Android 16 or later on the old phone, many carriers, including AT&T, Cricket, T-Mobile, Verizon and Xfinity Mobile in the US, support Transfer From Android during setup or later in Settings > Cellular. Keep both phones on Wi-Fi with Bluetooth turned on. If your carrier or phone doesn’t support it, use your carrier’s app or contact the carrier. If your new iPhone has a SIM tray and your Android phone uses a nano-SIM, you can simply move the card. For the rest of the move, see our step-by-step guide to switching from Android to iPhone.
Does moving the SIM erase anything?
No. Your photos, apps and messages are stored on the phone and in iCloud, not on the SIM card. A SIM card mainly holds your carrier identity, not your personal data. Learn more in does removing a SIM card delete everything and what happens when you switch SIM cards on iPhone.
Problems after moving the SIM
- “No SIM” or “Invalid SIM”: For a physical SIM, remove the tray, check that the card sits flat, put it back and restart the iPhone. If that doesn’t help, or your iPhone is eSIM-only, check Settings > General > About for a carrier settings update and confirm with your carrier that your line is active.
- “SOS” or “No Service” after an eSIM transfer: Wait a few minutes, then restart. Make sure your plan is turned on in Settings > Cellular. You can turn the line off and back on there, but don’t delete the eSIM unless your carrier tells you to. A deleted eSIM can’t be restored on the phone, so you’d need the carrier to issue a new one.
- Calls work but iMessage or FaceTime don’t: Go to Settings > Apps > Messages > Send & Receive, and Settings > Apps > FaceTime, then check that your phone number is selected. On older iOS versions, Messages and FaceTime appear directly in Settings.
- “SIM Not Supported” (locked phone from another carrier): Check Settings > General > About > Carrier Lock. “No SIM restrictions” means the phone is unlocked. A carrier-locked iPhone only accepts that carrier’s SIM, so ask the carrier to unlock it.
Frequently asked questions
When setting up a new iPhone, do you put the SIM card in first?
If the new iPhone has a SIM tray and you’re moving a physical SIM, yes, insert it before turning on the phone so it can activate during setup. If it’s eSIM-only, there’s no card; you transfer your number during setup instead.
Can I set up my new iPhone without a SIM card?
Yes. You can complete setup on Wi-Fi and transfer your data, then insert your SIM card or add your eSIM in Settings > Cellular later.
Will my old iPhone still work after I transfer my eSIM?
It still works on Wi-Fi for apps and iMessage, but it loses cellular service because your number moves to the new phone.
Do I need to call my carrier to set up a new iPhone?
Often not. Many carriers support transferring your number during setup. If the option doesn’t appear, try your carrier’s app or a QR code first. Call them if those don’t work, if you’re switching carriers, or if your Android phone or carrier doesn’t support Transfer From Android.
How we researched this guide
The SIM and eSIM steps here reflect how iPhone setup works as of November 21, 2026. We didn’t try them with every carrier, and eSIM transfer support differs from one carrier to the next, so ask yours if an option is missing.

Louis Mugan writes how-to and troubleshooting guides for EasyTechLife, covering Android phones, iPhones, laptops, Chromebooks, headphones and everyday software.
He aims to base each guide on official manufacturer documentation and support pages, and to link the sources so readers can check the steps for themselves. Questions or corrections? Use the contact page.