You can create a D drive in Windows 11 or 10 without extra software. You shrink an existing partition, usually C, then turn the freed space into a new volume with Windows’ built-in Disk Management. You won’t need to reinstall Windows. How long it takes depends on your disk and how much space C can give up.
This guide covers three ways to do it, how to fix common problems, and how to start using your new drive once it’s ready.
What Is a D Drive in Windows?
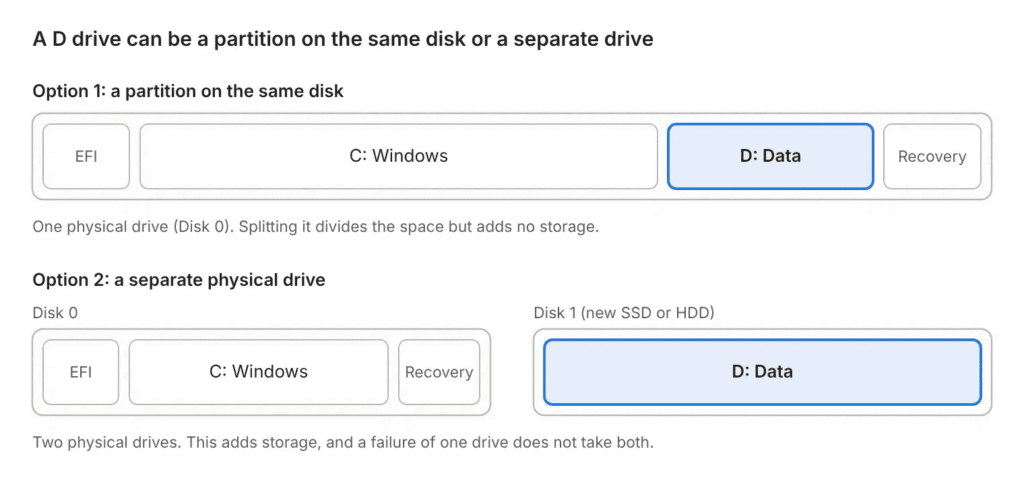
A D drive is simply a volume that Windows has given the letter D. It isn’t a special type of storage. It can be:
- A partition on the same physical disk as C. This is the most common setup and what most of this guide covers.
- A separate internal SSD or HDD.
- A USB drive or memory card, if D happens to be the next free letter.
Creating a D partition does not add storage. It divides the space you already have. A 512 GB disk split into C and D is still 512 GB in total.
People usually create a D drive to keep personal files apart from Windows and programs. This keeps them organized. D may survive some Windows reinstalls if you leave it untouched during setup, but that isn’t guaranteed. Always back up before resetting or reinstalling.
Can You Create a D Drive Without Losing Data?
Yes. Shrinking a partition and creating a new volume is designed to keep your existing files intact. Still, any change to a disk’s layout carries some risk, such as a power cut or a disk error mid-operation. Take these precautions first.
- Back up important files to an external drive or cloud storage. A backup on another partition of the same disk doesn’t count.
- Check for BitLocker or Device Encryption. Many Windows 11 PCs encrypt C by default. Shrinking usually still works, but save your recovery key first from your Microsoft account or Control Panel > BitLocker Drive Encryption.
- Plug in your laptop so the operation can’t be interrupted by a dead battery.
- Decide how much space C keeps. C needs room for Windows, your apps, updates, and temporary files. For many everyday PCs, 100–150 GB or more is a reasonable starting point. The right size depends on your software and total disk size.
Never delete or format C, or the EFI, Recovery, or other small system partitions, to make space. Doing so can stop Windows from starting. Only delete a partition if you are certain it holds nothing you need.
Method 1: Create D Drive From C Drive
Use this method if your PC has only a C drive with plenty of free space. You need to be signed in with an administrator account.
- Press Win + X and select Disk Management.
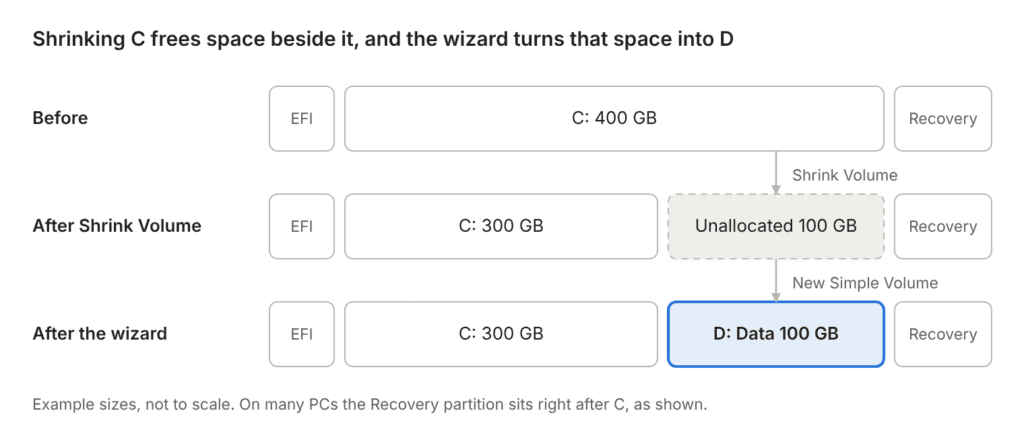
- Right-click your C: partition and select Shrink Volume. Windows calculates how much space can be freed, which may take a minute.
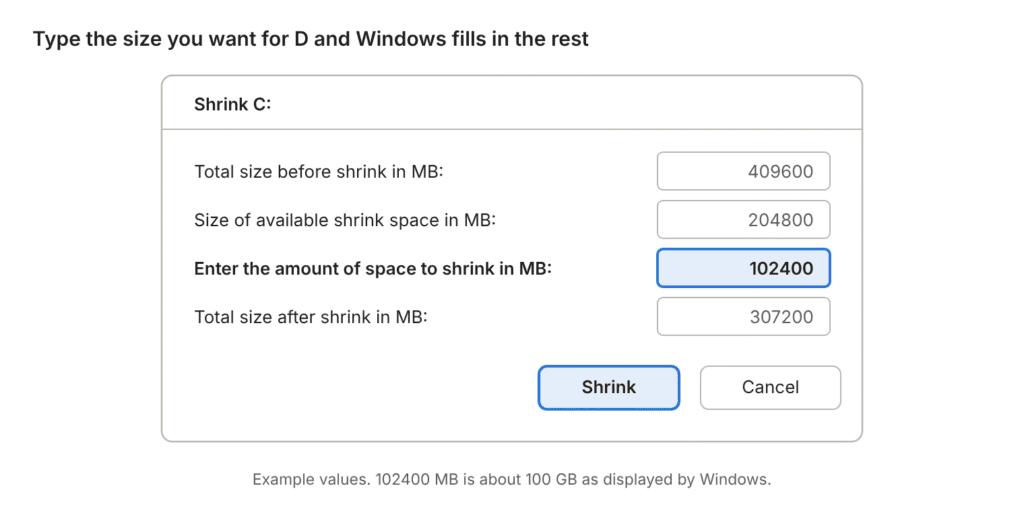
- In Enter the amount of space to shrink in MB, type the size you want for D. For example, entering 102400 MB creates about 100 GB as displayed by Windows.
- Click Shrink. A block labeled Unallocated appears to the right of C.
- Right-click the Unallocated space and select New Simple Volume, then click Next.
- Keep the default size to use all the unallocated space, then click Next.
- Choose D from the drive letter list and click Next. If D isn’t listed, see What If Drive Letter D Is Already Taken? below.
- Keep NTFS as the file system, type a volume label such as Data, leave Perform a quick format checked, and click Next.
- Click Finish.
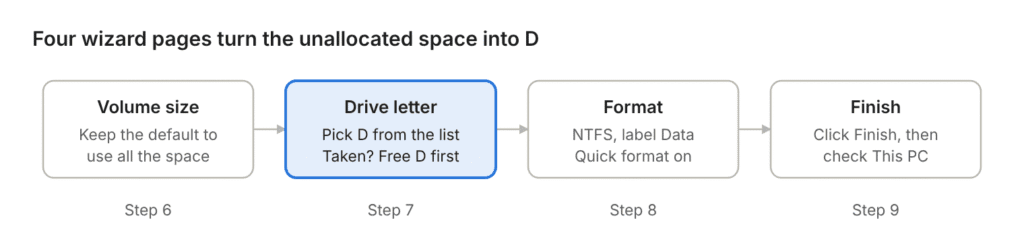
The quick format only affects the new, empty volume. Your files on C are not touched. Open File Explorer and go to This PC to confirm the new D drive appears.
If Windows offers much less shrink space than C’s free space suggests, see What to Do If You Can’t Shrink C Drive below.
Windows 11 alternative: Recent versions of Windows 11 can also do this in Settings > System > Storage > Advanced storage settings > Disks & volumes. Disk Management works the same on Windows 10 and 11, so this guide uses it throughout.
Method 2: Create D Drive From Unallocated Space or Another Partition
Use this method if your disk already has unallocated space, or if you have another large partition (such as E) to take space from.
Before you shrink anything, check the disk number, drive letter, and free space of the partition in Disk Management. Don’t select a Recovery, EFI, or other system partition. If the partition is on a different physical disk, the new D will be on that disk too, not on the same disk as C.
If unallocated space already exists, open Disk Management, right-click the Unallocated block, and follow steps 5–9 of Method 1.
If you want to take space from another partition:
- In Disk Management, right-click the partition with spare space and select Shrink Volume.
- Enter the size for D and click Shrink.
- Right-click the new Unallocated space and follow steps 5–9 of Method 1.
You could also delete an unused partition to free its space, but deleting erases everything on it. Copy its files elsewhere first, and never delete a system partition.
Method 3: Create D Drive on a New SSD or HDD
This is the only method that actually adds storage. It also puts your files on a separate physical disk, so a failure of one drive doesn’t take both.
- Install the new drive, then open Disk Management.
- If an Initialize Disk window appears, select GPT and click OK. If it doesn’t, find the new disk marked Not Initialized, right-click its name, and select Initialize Disk.
- The whole disk now shows as Unallocated. Right-click it and follow steps 5–9 of Method 1.
Only initialize a disk that is brand new, or whose contents you have backed up and no longer need. Initializing writes new partition-layout information to the disk. If a disk that used to hold files suddenly shows as Not Initialized, stop and investigate first. Initializing it can make recovering those files much harder.
What If Drive Letter D Is Already Taken?
If D isn’t in the drive letter list, another device is using it. This is usually a DVD drive, a USB stick, or a card reader. Free the letter first, then assign it to your new volume.
- In Disk Management, find the device currently labeled D:.
- Right-click it and select Change Drive Letter and Paths.
- Click Change, pick an unused letter such as K, and click OK.
- Click Yes on the warning that programs relying on the letter may stop working.
- Right-click your new volume, select Change Drive Letter and Paths > Change, choose D, and click OK.
If you’re still in the New Simple Volume wizard, you can assign any free letter for now and change it to D afterward with step 5.
Avoid reassigning the letter of a partition that holds installed programs. Shortcuts and apps pointing to the old letter will break.
What to Do If You Can’t Shrink C Drive
Disk Management can only shrink C up to the first file it can’t move. System files such as the page file, the hibernation file, and System Restore points often sit near the end of the partition. That’s why Windows may offer far less shrink space than C’s free space suggests.
Start with the safe fixes below, and run Shrink Volume again after each one.
- Free up space. Empty the Recycle Bin and run Disk Cleanup, including Clean up system files.
- Restart Windows and try again. A restart releases some temporary system files.
- Find the blocking file. Open Event Viewer > Windows Logs > Application and look for event ID 259 from the Defrag source. It names the file that stopped the shrink.
Advanced (Experienced Users Only): Temporarily Turn Off System Features
This section is for experienced Windows users. If you’re not comfortable changing system settings, stop after the safe fixes above. Microsoft’s Shrink a basic volume guide explains why some files block shrinking.
The blocking file is usually the hibernation file, the page file, or System Restore data. Turning these off temporarily can free more space, but it changes important Windows settings. Check Event ID 259 first and turn off only the feature that is blocking the shrink. Try this only after a verified backup, and turn the feature back on as soon as you finish.
- Hibernation: Open Terminal as administrator and run
powercfg /h off. Afterward, runpowercfg /h on. - Page file: Go to System > About > Advanced system settings > Performance Settings > Advanced > Virtual memory > Change. Select No paging file, click Set, and restart. Without a page file, Windows can run short of memory and can’t save crash data, so restore System managed size right after shrinking.
- System Protection: In System Properties > System Protection, select C, click Configure, and choose Disable system protection. Use this as a last resort, because it permanently deletes your existing restore points. After shrinking, return to the same screen, select Turn on system protection, and click Apply. The deleted restore points won’t come back.
Some third-party partition managers can do things Disk Management can’t, such as moving partition boundaries. These operations add risk, so use reputable software and back up important data first.
How to Use Your New D Drive
Your D drive is ready to store personal files, downloads, and games. Leave Windows and its core programs on C.
How to Open the D Drive
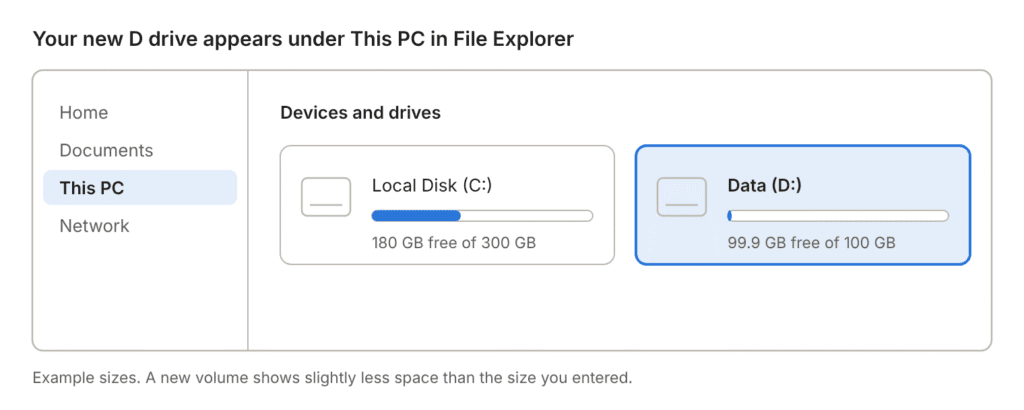
Open File Explorer (Win + E) and select This PC. D appears under Devices and drives. You can also type D: in the File Explorer address bar.
How to Move Personal Files From C to D
Move your Documents, Pictures, and other personal folders with the Location tab. This keeps them linked to Windows and your apps, unlike cut and paste. These steps are for local folders. If OneDrive manages your Documents, Desktop, or Pictures, read the OneDrive note below the steps before you move anything.
- On D, create a folder for each one, such as D:\Documents.
- In File Explorer, right-click Documents and select Properties.
- Open the Location tab and click Move.
- Select D:\Documents and click Select Folder, then Apply.
- Click Yes to move the existing files.
Always choose a folder on D, never the root of D itself. Moving a folder to the root mixes it with everything else on the drive and is hard to undo.
If OneDrive backs up your Documents, Desktop, or Pictures folders, check its settings in OneDrive settings > Sync and backup > Manage backup before moving them. Make sure your files are available on this PC and backed up. Depending on your setup, you may need to stop folder backup, or move the whole OneDrive folder to D. Microsoft’s supported method is to unlink, move, and relink OneDrive, as described in Change the location of your OneDrive folder. Don’t move a synced folder manually until you’ve confirmed how OneDrive will handle its files.
If you don’t see a Location tab, don’t force the move. The folder may be managed by OneDrive or another app. You can still copy ordinary files into a folder on D without relocating the Windows folder.
How to Save New Files to D by Default
- Open Settings > System > Storage.
- On Windows 11, select Advanced storage settings > Where new content is saved. On Windows 10, select Change where new content is saved.
- Set documents, music, photos, videos, and new apps to D: and click Apply for each.
This affects new content only. Existing files stay where they are. The new apps option mainly applies to Microsoft Store apps. Traditional desktop programs set their location in their own installers. Browsers and other programs may also keep saving to their own default folders, such as Downloads. You can change those separately in each program’s settings.
How to Install Apps and Games on D Drive
- Desktop programs: Choose Custom install in the installer and change the path to a folder on D, such as D:\Programs.
- Microsoft Store apps: New apps follow the setting above. Some installed apps can be moved via Settings > Apps > Installed apps, the … menu, then Move.
- Game launchers: Add a library folder on D. In Steam, use Settings > Storage. In the Xbox app, use Settings > Install options.
Don’t drag already-installed programs or the Program Files and Windows folders to D. They will stop working. Reinstall a program to D instead.
Remember: If C and D are on the same disk, moving files between them doesn’t add storage. It also doesn’t protect against disk failure. Keep a separate backup.
Frequently Asked Questions
Do I need third-party software to create a D drive?
No. Disk Management is built into Windows 10 and 11 and handles shrinking, creating, and formatting volumes. Third-party tools are mainly useful for moves Disk Management can’t do, such as resizing a partition that isn’t next to free space.
Will creating a D drive slow down my PC?
Not by itself. Creating a partition doesn’t make Windows slower. Performance depends on the physical disk, available free space, other activity on the disk, and the files you’re working with.
How big should the D drive be?
Give C enough room for Windows, your apps, and future updates, ideally 100–150 GB or more. The rest can go to D.
Can I merge D back into C later?
Yes. With Disk Management you usually have to delete D first, which erases everything on it. Copy D’s files elsewhere, right-click D in Disk Management, and select Delete Volume. Then right-click C and select Extend Volume. This only works if the freed space sits directly to the right of C. A recovery partition between them will block it. Some third-party tools can merge partitions without deleting D, but back up first either way.
My new D drive doesn’t show up in File Explorer. What’s wrong?
It most likely has no drive letter. In Disk Management, right-click the new volume, select Change Drive Letter and Paths > Add, and choose D. If the space still shows as Unallocated, the volume was never created, so run the New Simple Volume wizard. If it shows as RAW, don’t format it unless you’re certain it holds nothing important. Formatting erases it, and a drive that used to work but now shows RAW may have file-system damage that needs investigating first.
Can I create a D drive while installing Windows?
Yes. On the Where do you want to install Windows? screen, select the unallocated space, click New (or Create partition), and enter a size for C. Windows creates its own small system partitions automatically. After installation, use Disk Management to turn the remaining unallocated space into D.
Why does my new D drive show slightly less space than I entered?
Windows measures sizes in binary units. 102,400 MB shows as 100 GB in File Explorer, and formatting uses a small amount of space.

Louis Mugan is a seasoned technology writer with a talent for turning complicated ideas into clear, practical guidance. He focuses on helping everyday readers stay confident in a world where tech moves fast. His style is approachable, steady, and built on real understanding.
He has spent years writing for platforms like EasyTechLife, where he covers gadgets, software, digital trends, and everyday tech solutions. His articles focus on clarity, real-world usefulness, and helping people understand how technology actually fits into their lives.
Outside of his regular columns, Louis explores emerging tools, reviews products, and experiments with new tech so his readers don’t have to. His steady, friendly approach has made him a reliable voice for anyone trying to keep up with modern technology. get in touch at louismugan@gmail.com